How to Foldit, Part 5: Seeing the Problem
Hey folders!
Dev Josh here with the fifth post in a series of tips for better folding. << As always, more detailed scientific information will be bracketed off like this. >>
Last time we covered your tools for optimizing and refining. But where do you look to make refinements? Today we’re covering your tools for visualization. Starting with…
Camera Controls
Controlling the camera is the first step to really feeling in control of the protein. By now you probably know about clicking and dragging on the background to rotate your view. But there are many more hidden features to the camera! I also cover these in my tutorial video on moving stuff around in Foldit.
Rotating
Clicking and dragging around the edges of the background will keep the camera’s position fixed and only spin it around while still facing your pose.
Zooming
You might know that scrolling the mouse wheel zooms in and out, but you can zoom in/out even faster by holding the right mouse button (or Ctrl + left click) down and moving the mouse forward and backward.
Panning
You can hold the middle mouse button down (or Shift + left click) to pan the camera with your mouse.
Resetting
The Home key resets the camera to the default position.
Focusing
Pressing Q on a residue will focus the camera on it, while Shift+Q on the residue will also clip the foreground of the protein so you can get a better view of the residue you’re trying to focus on. Pressing Q or Shift+Q on the background will reset the focus on the center of the protein, which is useful when your protein is off-screen.
Clipping and Fading
You can fade the lighting (“fog”) on the protein by holding Ctrl + Alt + Left click and dragging. Or you can clip the background entirely by holding Ctrl + Shift + Left click and dragging. You can clip the foreground by holding Ctrl + Alt + Left click and dragging. In combination with Shift+Q to focus on a residue, these controls let you see just the part of the pose that you care about.
Visualization Options
If you open your View options, there's an overwhelming amount of control that you get over how you look at the puzzle. And there's a reason for this: how you see the protein is really important! It's one of the major differences separating experts from novices. In fact, I wrote a paper on this. So let's break down your options to know what they all do and why you'd want to use them. I think of them in 8 categories: issues, bonds, hydrogens, sidechains, color, shape, personal preference, and puzzle-specific options.
Issues
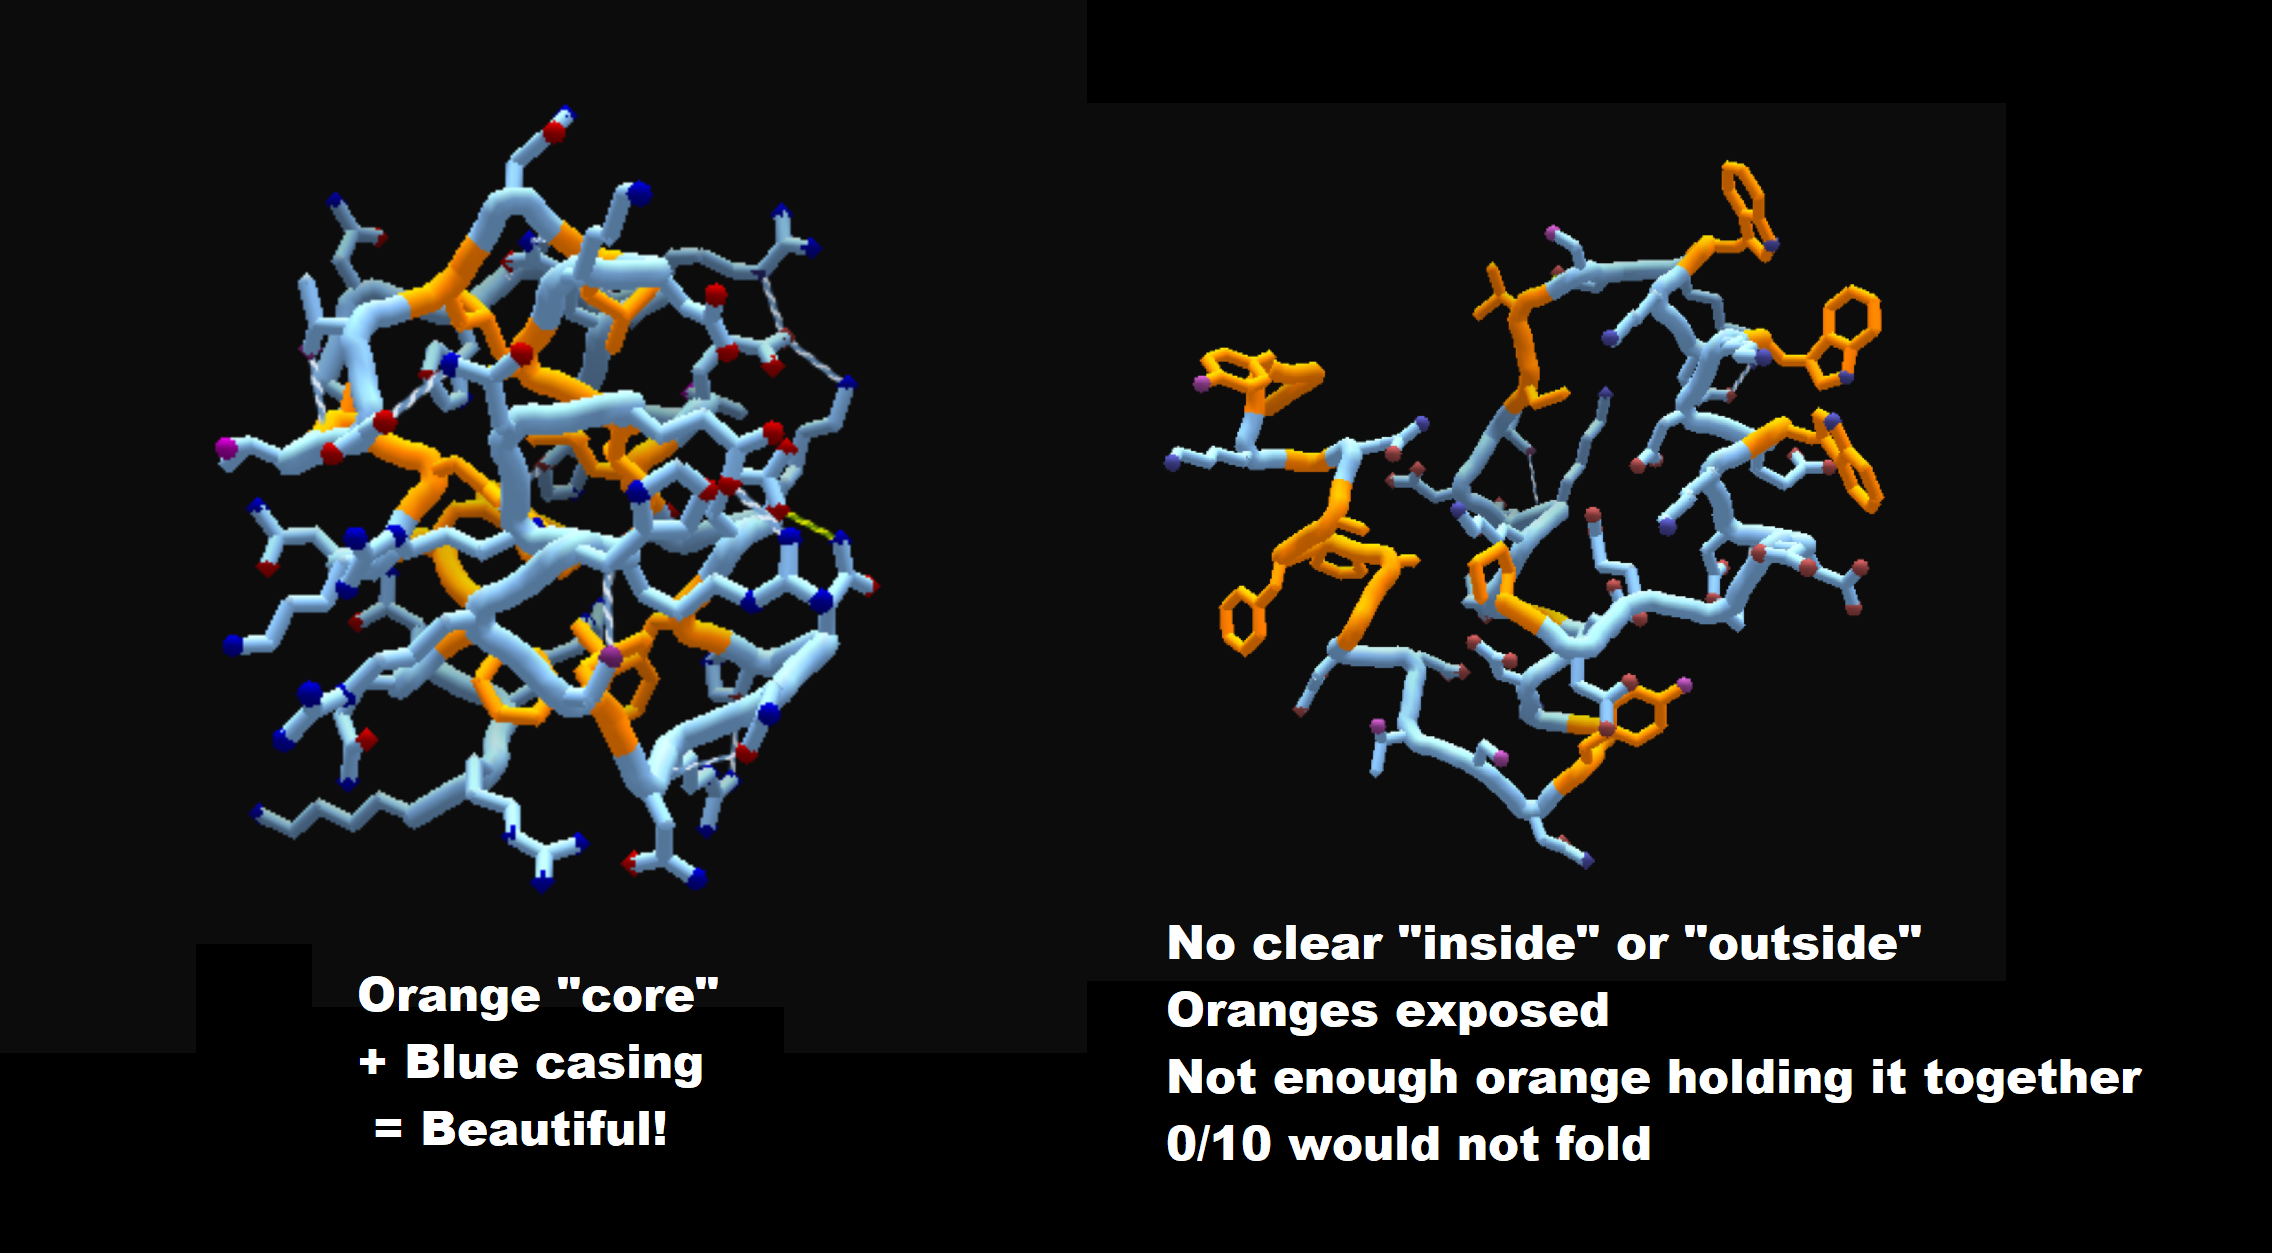
These options shine in the mid to late game when you have a draft and you're looking to clean it up by fixing the problems with it. The three main ones of course are “Show clashes”, “Show exposeds” (unburied orange hydrophobics), and “Show voids.” When possible, you want to leave these off since they add a lot of visual clutter. But while you're focusing on them, this is critical information. A finished protein isn't going to have any clashes at all, and a natural protein rarely has voids, at least not big ones. Depending on the protein's function, you may or may not have a couple exposed hydrophobics – there's not always a good way to bury every single one in prediction puzzles.
If you’re focusing on backbone refinement, it can be a good idea to trim the sidechains (see Sidechains) but turn on “Show sidechains with clashes or exposeds.” This makes the issues stick out really obviously.
Turning on “Show backbone issues” will point out places in your backbone that want to be Idealized. You can use Idealize or click the bubble to idealize the backbone: just watch out for the usual problems of Idealizing messing up other parts of your fold. This option will also show when a peptide bond is flipped 180 degrees <<the cis omega (?) angle, or “O” in ABEGO;>> which are pretty rare, so you can click the bubble to flip it back. By mid-game, you’ll want this on for the rest of the puzzle.

The last super important issue finder is “Relative score coloring.” While using a score-based coloring (see Color), this option will color the pose relative to itself. Without this option, your scores might look pretty average across the pose, but with relative coloring turned on, the better parts will become more green and the worse parts will become more red. This is really handy for figuring out what sections of your pose need the most attention.
Advanced issue options for the pros
Although it’s unclear if this option is still working, “Show expected residue burials” is supposed to show a blue halo around hydrophobics that are expected to be buried inside the protein.
The isosurface, on the other hand, does work consistently and can be very handy for fine-turning the shape of your pose. Essentially, the isosurface shows the accessible surface area, or the areas where water can reach. You can use this to make sure the isosurface doesn’t have any holes that would let water get into your hydrophobic core. The blue and red coloration on the isosurface cloud shows the electrostatic potential.
Tip for the pros: Sometimes the isosurface is thought of (mistakenly) as showing potential connections for hydrogen bonds. This is because the same color scheme is used for both, and there’s often a correlation between electrostatic potentials and unsatisfied hydrogens. (In fact, electrostatic potentials in hydrogen bonds are a key part in why the BUNS objective was introduced.) For example, oxygen is usually negative when its hydrogen is unsatisfied, and nitrogen is usually positive. But this is only a correlation: hydrogen bonds and electrostatic potentials are two fundamentally different forces. You can see electrostatic potentials most clearly in the positively charged amino acids (arginine, lysine, and histidine) and the negatively charged amino acids (glutamate and aspartate).
<< Glutamate and aspartate are often equated with glutamic acid and aspartic acid. But the acid forms are actually when the residue is “protonated,” or has a proton added to it, which neutralizes its electrostatic potential. Only in the -ate form (the “conjugate base”) are these residues electrostatically charged. In a protein’s normal environment (that is to say, cellular pH), the deprotonated, negative form is more stable, which is why the -ate forms are more commonly talked about.>>
Bonds
These options are useful when you’re trying to form or monitor bonds, though you want to keep these options off when you’re not using them to lower lag. Most of them, prefaced with “Show bonds” are pretty simple: they show any bonds that connect to the structure described. You can show bonds for helices, sheets, loops, sidechains, or non-protein (such as ligands or DNA). Note that these options are not mutually exclusive: a hydrogen bond could connect from a sidechain to a helix and count as both.
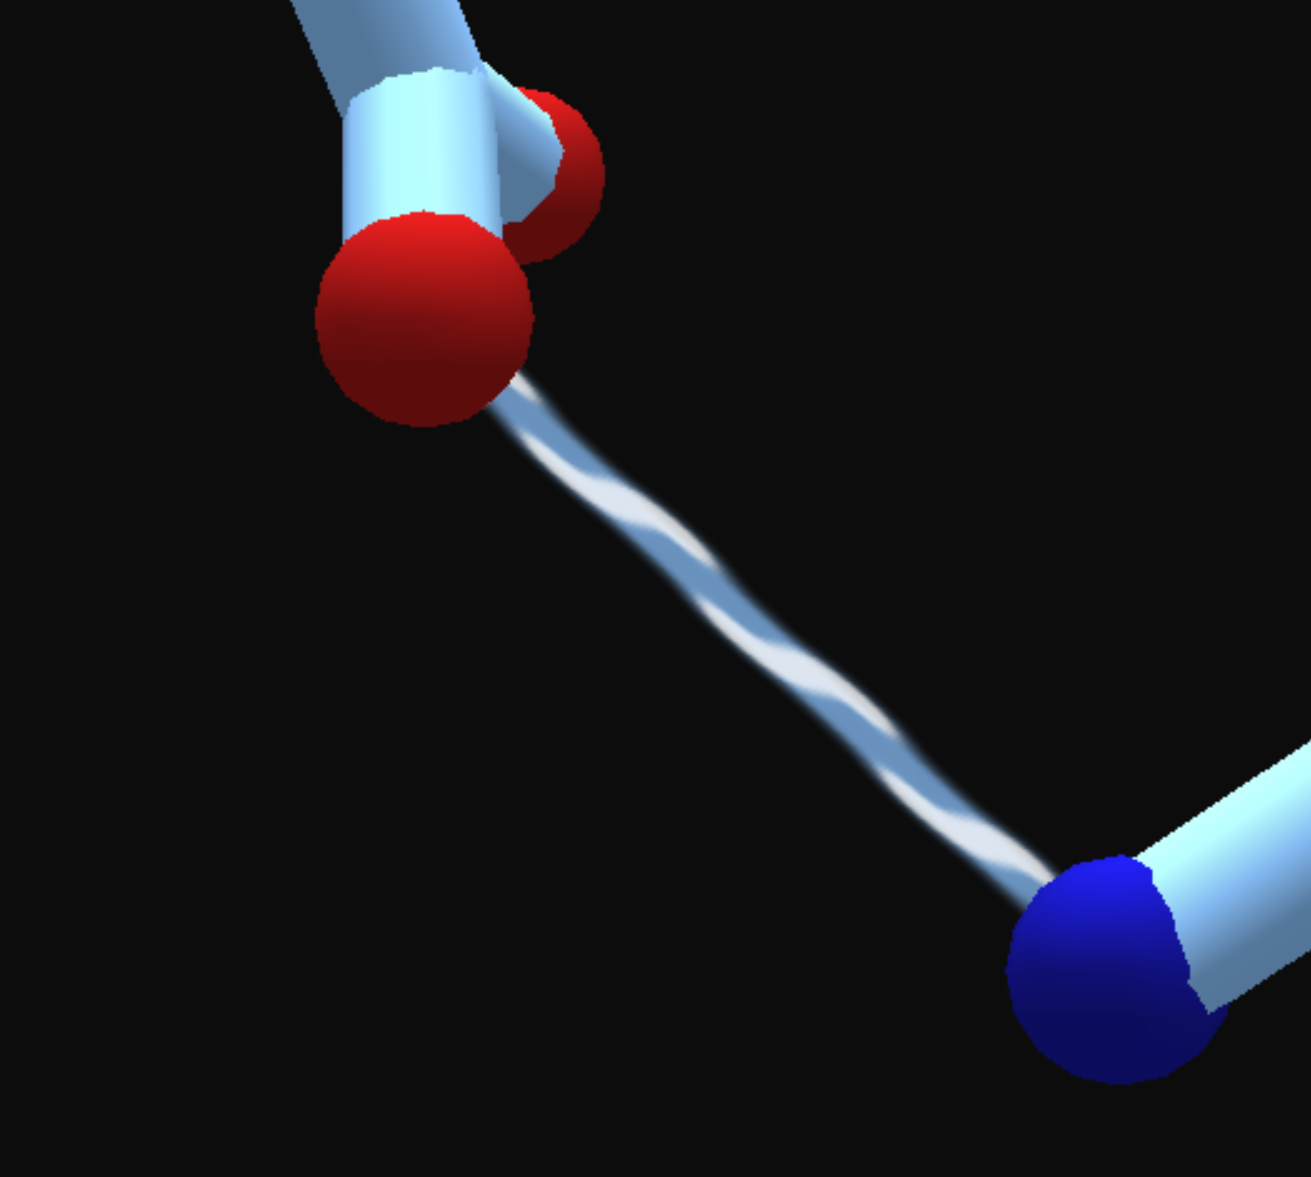
But the most valuable option here is “Show bondable atoms.” This turns on the red and blue dots (<< acceptors and donors>>) that show you what atoms are able to form bonds. Looking at these opens up a whole new jigsaw game of connecting the dots, especially in light of the new BUNS objective and the hydrogen bond network objective.
Hydrogens
While showing bondable atoms is nice, it’s the hydrogens that really show you where there’s room for hydrogen bonds, especially on sidechains. In Foldit, hydrogens are tiny white dots. You want to Hide All when you’re not worrying about hydrogens, as this saves some visual clutter. Showing All is useful for getting a better visualization of the space that the hydrogens take up when trying to pack your protein. But the most valuable option here is “Show Bondable H,” because this will show you what hydrogens are still available for making new bonds. It’s a good middle-ground when looking at your bond networks.
Sidechains
Similar to the hydrogen settings, you can hide all of your sidechains to reduce lag, show them all to see how things are packed together, or “Show Stubs.” Stubs gives you a preview of where the sidechains are, and you can hover over a stub to reveal the full sidechain.
The other sidechain option is “Show sidechains with clashes or exposed.” As I talked about with Issues, setting your sidechains to “Don’t Show” or “Show Stubs” and turning this on can really help problems stick out visually.
Color
There are a LOT of options for coloring your pose, so let’s break them down one at a time.
AAColor
This gives each of the 20 amino acids a unique color. It’s particularly helpful when you’re looking for one amino acid type, like cysteines (to form disulfide bridges) or prolines (to find expected kinks/bends in your pose).
AbegoColor
Remember ABEGO colors from the Rama map? With this color scheme, you can directly see the ABEGO colors of your entire pose.
CPK
CPK is based on the existing CPK coloring convention in chemistry. This scheme keeps your backbone dark gray, but colors oxygens red, nitrogens blue, and sulfurs yellow in a “sleeve” around the atom. This view is handy for seeing cysteines to make disulfide bridges or looking for oxygens and nitrogens that might form hydrogen bonds. Be careful not to confuse CPK with donors/acceptors, as shown in the picture below.

EnzDes
EnzDes is short for Enzyme Design. This mode is very similar to CPK, except it colors the backbone green instead of gray. It also puts a black nub on prolines to mark their unusual relationship with the backbone. EnzDes is good for looking at ligands, like in the Aflatoxin puzzles or anything using the Reaction Design tool.
Hydro…
There are three versions of Hydro coloring: basic Hydro, Hydro with Score, and Hydro with Score and CPK. Your basic Hydro view colors the entire protein as orange (hydrophobic) or blue (hydrophilic). With Score, it leaves the backbone alone but colors the sidechains to show how they’re currently scoring. Add CPK and now it will also show CPK coloring as described above: red oxygens, blue nitrogens, and yellow sulfurs. Your choice of color here depends on what you want to see: choose the level of nuance to fit your needs. Personally, I like Hydro/Score as a generally versatile view while working early/mid game with the hydrophobic interactions.
Ligand
A ligand, for the purposes of Foldit, is a small molecule that’s expected to interact with your protein in some way. The ligand-specific view is similar to EnzDes or CPK, except it gives a unique color to the ligand itself. When working with a ligand puzzle, use this or EnzDes to focus on your ligand target. For more tips on ligands, see this wiki page.
Rainbow
In the words of the great S0ckrates:
“Rainbow isn’t only just pretty to look at, it’s a natural progression of ROYGBIV from one end of the protein to the other, so you can find the middle and ends really quickly.”
In Rainbow view, the first residue is violet and the last one is red. This view is useful when you’re trying to work from one end of the protein to another, such as in Electron Density (ED) puzzles, or techniques that “walk the backbone.” (Recipes that do this are sometimes called “walkers” or include “rainbow” in their name.)
Rainbow also does make a pretty picture when showing off your fold!
Score…
Like Hydro, Score comes in 3 versions: Score, Score/Hydro, and Score/Hydro + CPK. With pure Score coloring, the pose will show how well each residue is scoring: green for good, red for bad, and a very bland yellow in the middle. Adding Hydro will color the sidechains by their hydrophobicity. Adding CPK will color the tips with CPK coloring. If you’re not sure what other view to use, Score/Hydro + CPK is an excellent go-to default choice for making all of the information you need available.
If you’ve got Score coloring on, consider turning on relative score coloring, as described above. This will make your greens greener and your reds redder so you can more clearly see where your problem regions are.
Shape
The game calls these options “View Protein,” but I’m calling it Shape. Like Color, you have a lot of options here. These options drastically change how the pose itself looks.
Cartoon
Cartoon is the default view. It’s the easiest to work with and the best general purpose option. If views were fantasy RPG classes, this is your basic warrior with balanced stats. Cartoon has two slight variations: Cartoon Ligand and Cartoon Thin.
-
Ligand
Cartoon Ligand makes ligands a bit thinner than in standard Cartoon view. I haven’t personally played around with ligands enough to know if this is helpful, but if your ligand is looking too chunky, this is your view.
-
Thin
Cartoon Thin makes sidechains a bit thinner. The difference is slightly noticeable. Use this view if your sidechains feel self-conscious about their weight.
Sphere
I’m going out of order from how this list is presented in the game because Sphere is different from the remaining four views. Similar to Isosurface, Sphere gives you a preview of how much space your protein is actually taking up. Although it’s bulky to do any hand-folding with, sphere view is great for getting a better estimate of how bad clashes, voids, and exposeds are in real-life physics, and checking the overall shape and surface coverage of your pose.
Line, Stick, Trace Line, and Trace Tube
These four options are similar in that they more realistically show how the atoms of your protein are actually arranged, showing bonds as straight lines and atoms as corners. Line is the thinnest option, then Stick, then Trace Line, then Trace Tube is the thickest. These views are sometimes useful for ligands or Electron Density (ED) puzzles, though your mileage may vary. Have a good use for these options? Post it in the comments below!
Tips for the pros:
The cylinders in Stick representation are a good approximation of the electron density of the covalent bonds. Use this for estimating the real solidity of your protein’s electron densities.
Personal Preference
These options are mostly aesthetic choices.
Show Outlines
I’ve heard outlines can be helpful if there’s a guide, commonly called Quest to the Native (QTTN) puzzles. Mostly this is an aesthetic choice to make your folding look more cartoonish.
Light Background
Up until very recently, Foldit’s default background was an eye-bleeding bright yellow color. We recently switched it to default to dark mode, but if you’d like light mode back, here it is. If you’re reading this from the future and saying “Wait, the light background used to be the default and setting it to dark was buried in this menu?”, you’re welcome.
Pulse when working
Sometimes it’s nice to get visual feedback that your wiggle is wiggling or your shake is shaking. If you are photosensitive or want to save GPU power, turn this off.
Fade GUI
With this option on, the GUI will fade out after a few seconds of holding a mouse button down (as in, any camera movement). The GUI (Graphical User Interface) in this case includes the leaderboards, chat, and any information in the corner about your current tool and its operations. Good when you want a clean screen to look at your beautiful work.
Hide GUI
This option manually turns off the GUI elements described above. Good for taking screenshots and the like, or if you just want to be alone with your protein.
Puzzle-Specific
These options aren’t part of your everyday toolkit, but they can be critically important on specific puzzle types.
Show constraints
Sometimes a puzzle wants your pose to be in a specific area, such as attached to a binding target. With this option, you see those constraints as thin red lines drawing your pose to where it’s supposed to be. This is usually good to keep on, since they don’t appear while you satisfy the constraints.
Show mutated segments
This is the “track changes” option of Foldit. For every residue you’ve mutated to be something else since starting the puzzle, this will color that residue white. This is especially handy for evolving (evo’ing) other players’ solutions or just to remind yourself which residues weren’t what they started as.
X-ray tunnel for ligand
As far as option names go, this one confused me the most starting out. By now we’ve talked a bit about what ligands are, but what’s an X-ray tunnel? This one’s actually pretty cool, and best explained visually.

Essentially, this view gives you x-ray vision that will peel away any parts of the protein between you and your ligand. Critically useful when your ligand is hidden in the middle of a protein.
Show Symmetric Chains
A symmetry puzzle is where you design a pose that has one or more symmetric copies of itself. <<This is called a dimer for two copies, a trimer for three, and so on. Your original pose is called the monomer. When the monomer is put together with its copies, this is called an oligomer, though Foldit usually just calls it a “complex.”>> When working with a symmetry puzzle, this option shows the symmetric copies of your pose (the “main chain”).
Symmetric Chain Colors
Without this option, your symmetric chains will all be the same dark color. With this option, they each get their own unique color. Personally I just think it’s pretty.
Show Guide
If the puzzle has a guide, this toggles its visibility.
Pulse Guide
If the puzzle has a guide, this gives it the faintest pulse while a tool is running (similar to “Pulse when working”).
Color relative to guide
Contrary to popular belief, this option does not color your pose based on how close it is in aligning to the guide. Rather, it shows how well that residue is scoring relative to how well that residue scores on the guide pose. In this way, this option is a kind of relative score coloring.
Customizing Colors
In addition to colorblind mode, you can fully customize all of the colors of Foldit by editing the theme file.
The Best Visualization
Now you know all of the ways you can visualize your pose, but the best visualization of all is someone else’s eyes. When you have a pose that you don’t know what to do with or that you want to show off, use the camera button in the chat window to share a screenshot with other players. Or better yet, join a group and share your solution directly, then load their solutions and check out what they did. Evo’ing many players’ solutions is the best way to train your eye for what’s good and what’s bad when it comes to Foldit.

This is the end of the beginner’s introduction to Foldit. Congratulations on making it this far! In the next part, we’ll return to our original question: what makes a good fold? Back when you were just starting out, I gave you three simple rules. But now that you’re becoming an intermediate player, it’s time to add some nuance and talk about your other objectives for folding a scientifically useful and high-scoring solution.
Until next time, happy folding!
Summary:
- There are a lot of camera controls
- Your view options help you look at/modify:
- Issues, like clashes, voids, and exposes
- Bonds and bondable atoms
- Hydrogens
- Sidechains
- Color
- Shape
- Personal preferences
- Puzzle-specific stuff