On recent Design Puzzles, I have been making barrels from
loops and parallel sheets. I have tried barrels with
triangular cross-sections and square cross-sections.
Below is about Puzzle 1546 where I tried square barrels.

Sequence and Secondary Structure:

In Puzzle 1546, I used 2 different starting sequences
& secondary structure settings, each with 107 residues:

     000000000111111111122222222223333333333444444444455555555556
     123456789012345678901234567890123456789012345678901234567890
     eeHeeHeeHeeHeeHeeHeeHeeHeeeeHeeeeHeeeeHeeeeHeeeeHeeeeHeeeeHe
Je1a=vtLvtLvtLvtLvtLvtLvtLvtLtvtvLtvtvLtvtvLtvtvLtvtvLtvtvLtvtvLt
Je1b=tvLtvLtvLtvLtvLtvLtvLtvLvtvtLvtvtLvtvtLvtvtLvtvtLvtvtLvtvtLv

     00000000000000000000000000000000000000011111111
     66666666677777777778888888888999999999900000000
     12345678901234567890123456789012345678901234567
     eeeHeeeeHeeeeHeeeeHeeeeHeeHeeHeeHeeHeeHeeHeeHee
Je1a=vtvLtvtvLtvtvLtvtvLtvtvLvtLvtLvtLvtLvtLvtLvtLvt
Je1b=tvtLvtvtLvtvtLvtvtLvtvtLtvLtvLtvLtvLtvLtvLtvLtv

Each contains many sheets (e) of length 2 or 4 made
of valine (v) and threonine (t) residues separated by
helices (H) of length 1 made of leucine (L) residues.
I chose these residues because I had read that the
best sheet residues are tyrosine (y), phenylalanine (f),
tryptophan (w), threonine (t), valine (v), or
isoleucine (i) while the best helix residues are
methionine (m), alanine (a), leucine (l), glutamate (e),
or lysine (k).

My goal was to have the hydrophilic threonines on the
outside of the barrel and the hydrophobic valines on the
inside of the barrel. I also wanted the leucines to end
on the outside of the barrel, despite being hydrophobic.
Surprisingly, in previous puzzles, leucines seemed to work
better at these positions than other (generally hydrophilic)
residues that I tried.

I chose single-residue helices instead of multiple-residue
loops between the sheets because alpha-helices turn about
100 degrees per residue. For triangle-shaped barrels, I
wanted 120 degree turns between sheets. For square-shaped
barrels, I wanted 90 degree turns between sheets.
Having 100 degree turns seemed like a good compromise.
Using less residues might also help the barrels fold
properly in the lab, letting residues meant to
hydrogen-bond with each other be closer in the sequence
to each other.

Once I set the desired sequence and secondary structure,
I went into the selection interface, selected all 107
residues, and then did 5 2 5 2 to idealize the structure.
This made the sheets flat and put bends at the helices.
Next I unfroze everything. Then I used the recipe
FreezeSelectSome1 (https://fold.it/portal/recipe/102617)
to freeze only the backbones for the sheet residues.
This left the helices free to move and left all sidechains
free to move. Then I saved the structures as Je1a or Je1b.
Next, I needed to plan out a banding strategy. Since
I wanted all valines to end inside the barrel, I needed
many bands between pairs of valine beta-carbons (atom #5).
My plan was to use the recipe Band Copy-Paste 1.5
(https://fold.it/portal/recipe/100369) to make all these
bands, so I list below the inputs needed for this recipe
in the following format:
residue1-residue2-atom1-atom2-goallength-bandstrength-1

38 valine-valine bands for Je1a:
   1-4-5-5-0-1-1     4-7-5-5-0-1-1    7-10-5-5-0-1-1
 10-13-5-5-0-1-1   13-16-5-5-0-1-1   16-19-5-5-0-1-1 19-22-5-5-0-1-1
 22-26-5-5-0-1-1
 26-31-5-5-0-1-1   31-36-5-5-0-1-1   36-41-5-5-0-1-1 41-46-5-5-0-1-1
 46-51-5-5-0-1-1   51-56-5-5-0-1-1   56-61-5-5-0-1-1 61-66-5-5-0-1-1
 66-71-5-5-0-1-1   71-76-5-5-0-1-1   76-81-5-5-0-1-1
 28-33-5-5-0-1-1   33-38-5-5-0-1-1   38-43-5-5-0-1-1 43-48-5-5-0-1-1
 48-53-5-5-0-1-1   53-58-5-5-0-1-1   58-63-5-5-0-1-1 63-68-5-5-0-1-1
 68-73-5-5-0-1-1   73-78-5-5-0-1-1   78-83-5-5-0-1-1
 81-85-5-5-0-1-1
 85-88-5-5-0-1-1   88-91-5-5-0-1-1   91-94-5-5-0-1-1 94-97-5-5-0-1-1
97-100-5-5-0-1-1 100-103-5-5-0-1-1 103-106-5-5-0-1-1

38 valine-valine bands for Je1b:
   2-5-5-5-0-1-1     5-8-5-5-0-1-1    8-11-5-5-0-1-1
 11-14-5-5-0-1-1   14-17-5-5-0-1-1   17-20-5-5-0-1-1 20-23-5-5-0-1-1
 23-27-5-5-0-1-1
 27-32-5-5-0-1-1   32-37-5-5-0-1-1   37-42-5-5-0-1-1 42-47-5-5-0-1-1
 47-52-5-5-0-1-1   52-57-5-5-0-1-1   57-62-5-5-0-1-1 62-67-5-5-0-1-1
 67-72-5-5-0-1-1   72-77-5-5-0-1-1   77-82-5-5-0-1-1
 25-30-5-5-0-1-1   30-35-5-5-0-1-1   35-40-5-5-0-1-1 40-45-5-5-0-1-1
 45-50-5-5-0-1-1   50-55-5-5-0-1-1   55-60-5-5-0-1-1 60-65-5-5-0-1-1
 65-70-5-5-0-1-1   70-75-5-5-0-1-1   75-80-5-5-0-1-1
 82-86-5-5-0-1-1
 86-89-5-5-0-1-1   89-92-5-5-0-1-1   92-95-5-5-0-1-1 95-98-5-5-0-1-1
98-101-5-5-0-1-1 101-104-5-5-0-1-1 104-107-5-5-0-1-1

I also wanted to try clockwise (CW) and counterclockwise (CCW)
versions of both Je1a and Je1b. Each required different
hydrogen-bonds between the sheets. I list below the inputs
used for these, again in the format:
residue1-residue2-atom1-atom2-goallength-bandstrength-1

Here atom1-atom2 is always 4-1 for oxygen (O) to nitrogen (N)
atoms on the backbone, goallength is always 2.6 for
2.6 angstroms (a little shorter than most O-N distances in
hydrogen-bonds, but it seems to work), and bandstrength is 3
(larger than 1, which I used for the valine-valine bands above).

Also below are charts giving the residue #'s for all the
sheet residues. Between certain pairs of residue #'s are
\ or / to indicate the hydrogen-bonds I want to form using
bands. These are the hydrogen-bonds that will hold the
barrel together.

48 bands for Je1a CW or Je1b CCW:
   If residue #'s rise from left to right,
   the atom # order is 4=O to 1=N (both on backbone).
   All Je1a CW bands go downward from v to t.
   All Je1b CCW bands go downward from t to v.

    1 2          4 5          7 8         10 11
     \            \            \            \
   13 14        16 17        19 20        22 23
  /  \         /  \         /  \         /  \
25 26 27 28  30 31 32 33  35 36 37 38  40 41 42 43
  /  \  /      /  \  /      /  \  /      /  \  /
45 46 47 48  50 51 52 53  55 56 57 58  60 61 62 63
  /  \  /      /  \  /      /  \  /      /  \  /
65 66 67 68  70 71 72 73  75 76 77 78  80 81 82 83
     \  /         \  /         \  /         \  /
   85 86        88 89        91 92        94 95
     \            \            \            \
   97 98       100 101      103 104      106 107

48 bands for Je1a CW or Je1b CCW:
 1-14-4-1-2.6-3-1   4-17-4-1-2.6-3-1   7-20-4-1-2.6-3-1  10-23-4-1-2.6-3-1
25-13-4-1-2.6-3-1  13-27-4-1-2.6-3-1  30-16-4-1-2.6-3-1  16-32-4-1-2.6-3-1
35-19-4-1-2.6-3-1  19-37-4-1-2.6-3-1  40-22-4-1-2.6-3-1  22-42-4-1-2.6-3-1
45-26-4-1-2.6-3-1  26-47-4-1-2.6-3-1  47-28-4-1-2.6-3-1
50-31-4-1-2.6-3-1  31-52-4-1-2.6-3-1  52-33-4-1-2.6-3-1
55-36-4-1-2.6-3-1  36-57-4-1-2.6-3-1  57-38-4-1-2.6-3-1
60-41-4-1-2.6-3-1  41-62-4-1-2.6-3-1  62-43-4-1-2.6-3-1
65-46-4-1-2.6-3-1  46-67-4-1-2.6-3-1  67-48-4-1-2.6-3-1
70-51-4-1-2.6-3-1  51-72-4-1-2.6-3-1  72-53-4-1-2.6-3-1
75-56-4-1-2.6-3-1  56-77-4-1-2.6-3-1  77-58-4-1-2.6-3-1
80-61-4-1-2.6-3-1  61-82-4-1-2.6-3-1  82-63-4-1-2.6-3-1
66-86-4-1-2.6-3-1  86-68-4-1-2.6-3-1  71-89-4-1-2.6-3-1  89-73-4-1-2.6-3-1
76-92-4-1-2.6-3-1  92-78-4-1-2.6-3-1  81-95-4-1-2.6-3-1  95-83-4-1-2.6-3-1
85-98-4-1-2.6-3-1 88-101-4-1-2.6-3-1 91-104-4-1-2.6-3-1 94-107-4-1-2.6-3-1

48 bands for Je1a CCW or Je1b CW:
   If residue #'s rise from left to right,
   the atom # order is 4=O to 1=N (both on backbone).
   All Je1a CCW bands go downward from t to v.
   All Je1b CW bands go downward from v to t.

    1 2          4 5          7 8         10 11
     /            /            /            /
   13 14        16 17        19 20        22 23
     /  \         /  \         /  \         /  \
25 26 27 28  30 31 32 33  35 36 37 38  40 41 42 43
  \  /  \      \  /  \      \  /  \      \  /  \
45 46 47 48  50 51 52 53  55 56 57 58  60 61 62 63
  \  /  \      \  /  \      \  /  \      \  /  \
65 66 67 68  70 71 72 73  75 76 77 78  80 81 82 83
  \  /         \  /         \  /         \  /
   85 86        88 89        91 92        94 95
     /            /            /            /
   97 98       100 101      103 104      106 107

48 bands for Je1a CCW or Je1b CW:
 13-2-4-1-2.6-3-1   16-5-4-1-2.6-3-1   19-8-4-1-2.6-3-1  22-11-4-1-2.6-3-1
26-14-4-1-2.6-3-1  14-28-4-1-2.6-3-1  31-17-4-1-2.6-3-1  17-33-4-1-2.6-3-1
36-20-4-1-2.6-3-1  20-38-4-1-2.6-3-1  41-23-4-1-2.6-3-1  23-43-4-1-2.6-3-1
25-46-4-1-2.6-3-1  46-27-4-1-2.6-3-1  27-48-4-1-2.6-3-1
30-51-4-1-2.6-3-1  51-32-4-1-2.6-3-1  32-53-4-1-2.6-3-1
35-56-4-1-2.6-3-1  56-37-4-1-2.6-3-1  37-58-4-1-2.6-3-1
40-61-4-1-2.6-3-1  61-42-4-1-2.6-3-1  42-63-4-1-2.6-3-1
45-66-4-1-2.6-3-1  66-47-4-1-2.6-3-1  47-68-4-1-2.6-3-1
50-71-4-1-2.6-3-1  71-52-4-1-2.6-3-1  52-73-4-1-2.6-3-1
55-76-4-1-2.6-3-1  76-57-4-1-2.6-3-1  57-78-4-1-2.6-3-1
60-81-4-1-2.6-3-1  81-62-4-1-2.6-3-1  62-83-4-1-2.6-3-1
65-85-4-1-2.6-3-1  85-67-4-1-2.6-3-1  70-88-4-1-2.6-3-1  88-72-4-1-2.6-3-1
75-91-4-1-2.6-3-1  91-77-4-1-2.6-3-1  80-94-4-1-2.6-3-1  94-82-4-1-2.6-3-1
97-86-4-1-2.6-3-1 100-89-4-1-2.6-3-1 103-92-4-1-2.6-3-1 106-95-4-1-2.6-3-1

The above give 38+48=86 bands in all for each of
Je1a CW, Je1a CCW, Je1b CW, and Je1b CCW.

When I used Band Copy-Paste 1.5
(https://fold.it/portal/recipe/100369) to create
all these bands, I checked the sidechain bands box,
copy/pasted all of the text for the 86 bands above
into the import box as one big block of text,
clicked import, waited, then clicked quit. At the
end, I had to enable all the bands. Then I would
save the banded structures as Je1a CW, Je1a CCW,
Je1b CW, or Je1b CCW.
Once I had the structure banded and partially frozen,
I would do many manual steps. I'd cycle among shake,
wiggle sidechains, wiggle backbones, & wiggle all in
no particular order, all at low wiggle power, usually
with clashing importance (ci) set to 1, but sometimes
with ci set lower (like 0.1).
I also found it helpful to add some extra "anchor"
bands by hand during an early wiggle sidechains step.
I would attach one band to each end of the barrel and
stretch them out as far as I could to make an axis for
the barrel. This helped keep the barrel from tangling
with itself. Once I had this axis, I would attach bands
from each helix residue far out into space to enforce
the CW or CCW shape I wanted. I would try to make these
bands perpendicular to the axis of the barrel.
To assess the CW or CCW shape, I'd color the barrel as
rainbow and view the barrel from its blue or red end,
tabbing on residue 1 (blue) or 107 (red) and then using
the arrows to scan towards the opposite end. I wanted
these scans to go CW from each end for the CW barrels
and to go CCW from each end for the CCW barrels. That is,
when viewing from the blue end, scanning from residue
1 to 107 should go CW for the CW barrels and CCW for the
CCW barrels. Similarly, when viewing from the red end,
scanning from residue 107 to 1 should go CW for the CW
barrels and CCW for the CCW barrels.
The charts below helped me position the anchor bands
from the helix residues to space to enforce CW or CCW
barrels. N E S W are just compass directions. They
could just as well be up right down left on the screen.
For CW barrels:
N E S W viewed from blue (residue 1) end
N W S E viewed from red (residue 107) end
3 6 9 12
15 18 21 24
29 34 39 44
49 54 59 64
69 74 79 84
87 90 93 96
99 102 105
For CCW barrels:
N W S E viewed from blue (residue 1) end
N E S W viewed from red (residue 107) end
3 6 9 12
15 18 21 24
29 34 39 44
49 54 59 64
69 74 79 84
87 90 93 96
99 102 105
During the process of wiggling, shaking, & varying
ci, I'd often adjust the positions of anchor bands
to improve the barrel's appearance.
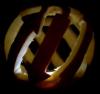
Below are screen-shots near the end of this stage
of folding showing Je1b CW & its anchor bands. All
images are colored with rainbow & shown as cartoon.
The secondary structure & sequence are set as in my
original design (2 or 4-residue sheets w/sequences
TV or VTVT & 1-residue leucine helices). The sheet
backbones are still frozen. I label residues 9 and
105, which should have bands pointing S (down). In
the top image, residue 1 is labeled "Je1b CW":
Once things looked alright, I'd save the structure
and then do a stage with ci=1 and low wiggle power.
I usually began with wiggle sidechains and would
remove all but the 2 axis anchor bands while it ran.
Then I'd do wiggle backbone, shake, and wiggle all,
in that order. Then I'd save the structure.

Next I'd do another stage with ci=1 and low wiggle power.
In this stage I'd start with wiggle sidechains and
remove the rest of the anchor bands while it ran.
Then I'd do wiggle backbone, shake, and wiggle all,
in that order. Then I'd save the structure.

At this point the structures all still had frozen
sheet backbones and 86 internal bands (38 between
valines & 48 to form hydrogen bonds).
Next I'd unfreeze the structures but leave their
86 bands intact. Then I would run Loop rebuild 9.0a
(https://fold.it/portal/recipe/102557) with ci=1 and
low wiggle power on them. I would use this recipe's
default settings but would set the rebuild length to 6,
the rebuild criterion to 4, check the 'use remix' box,
and set MSflag to 0 (shake but don't mutate). I would
let this run until a full cycle (102 rb attempts) with
no gains would occur. Then I'd quit this recipe and
save its results.

Next I'd run Loop rebuild 9.0a again with almost
the same settings, but this time I'd set the rebuild
length to 4. I would run this until a full cycle
(this time 104 rb attempts) with no gains would
occur. Then I'd quit this recipe and save its results.

At this point, the structures still had 86 bands,
no frozen residues, and their original sequences
and secondary structure settings.

Next I'd run Loop rebuild 9.0a again with almost
the same settings, but this time I'd set the rebuild
length to 6 and MSflag to 1 (mutate then shake).
Again I'd let this run until a full cycle (102 rb
attempts) with no gains occurred. Then I'd quit
this recipe and save its results.

Next I'd run Loop rebuild 9.0a again with almost
the same settings, but this time I'd set the rebuild
length to 4 and MSflag to 1 (mutate then shake).
Again I'd let this run until a full cycle (104 rb
attempts) with no gains occurred. Then I'd quit
this recipe and save its results.

After that I'd run a variety of recipes on the
barrels with ci=1 and low wiggle power. Sometimes the
valines would mutate to other amino acids & this would
remove some valine-valine bands.

Next I'd run some recipes with ci=1 and medium
wiggle power. At some point, one of these recipes
would remove all remaining bands.
Below (and at http://foldit.wikia.com/wiki/Puzzle_1546)
are screen-shots of my best-scoring structure
(solo rank 49) soon after Puzzle 1546 ended. I ran
auto secondary structure, colored as abego, and
viewed as cartoon before taking these screen-shots.
Note that all residues have become sheet or loop:
Below is a distance map for the same structure
made using DistMap1.1 with its default settings
(https://fold.it/portal/recipe/101868), also
after clicking on auto secondary structure:
See http://foldit.wikia.com/wiki/Distance_Maps and
http://memorize.com/protein-distance-maps/jeff101
for more details about distance maps.
This is impressive work, jeff101! I especially appreciate your documentation, and the thoroughness with which you describe your methods. Maybe others will try to reproduce your results!
My main concerns with these types of folds are usually (1) backbone strain and (2) core packing. On the one hand, we want an unstrained backbone that makes good hydrogen bonds, with all residues in the densely-populated regions of the Ramachandran map; on the other hand, we want a well-packed core with no voids and no unbonded polar atoms. I think there is usually something of a trade-off between these two traits, as a perfectly-ideal backbone will need to contort in order to accommodate good packing, and it can be difficult to find an arrangement that satisfies both of these traits. Looking at some of the solutions you shared, jeff101, I think you've done a pretty good job on both counts! There are a few more strained residues than I typically like to see (look for residues with negative "backbone" sub-score), and a couple buried polar atoms that are a little worrisome, but still we'll put it through Rosetta@home analysis and see how Rosetta likes it!
If anybody wants to read up on natural proteins with a similar fold (there are just a handful that we know of), you will want to search for the term "beta-solenoid." This fold is generally considered distinct from "beta-barrels" (like GFP), where the β-strands are more parallel with the axis of the barrel.
I kept running 1546 after it expired until
the scores settled. Below is a chart of my
final scores and how they would rank as solos
if they had reached these scores by the time
1546 expired:

Structure   Score      Solo Rank
  Je1a CCW  10593.139  55
  Je1a CW   10947.449  46
  Je1b CCW  10810.164  49 <- soon after 1546 expired
  Je1b CCW  11156.699  41        (shown earlier)
  Je1b CW   11030.964  46
T-Je1b CW   11541.729  31
B-Je1b CW   11602.723  30

While most of these structures are solos,
T-Je1b CW and B-Je1b CW are evos sharing
common ancestors with Je1b CW. T-Je1b CW
was evo'd first by Toshiue & then by me.
B-Je1b CW was evo'd first by Toshiue,
then by Bruno Kestemont, & then by me.
It's too bad Toshiue and Bruno didn't
evo Je1b CCW instead!

The above results show that on a faster
machine or in the right folder's hands,
square barrels as described in this Forum
thread can give reasonable Foldit scores.
I'm trying to reproduce a barrel with another set of bands from jeff. Not easy, but with patience and some hand fold band in space bands, it seems to work